Introduction: Why This Centerpiece Works So Well
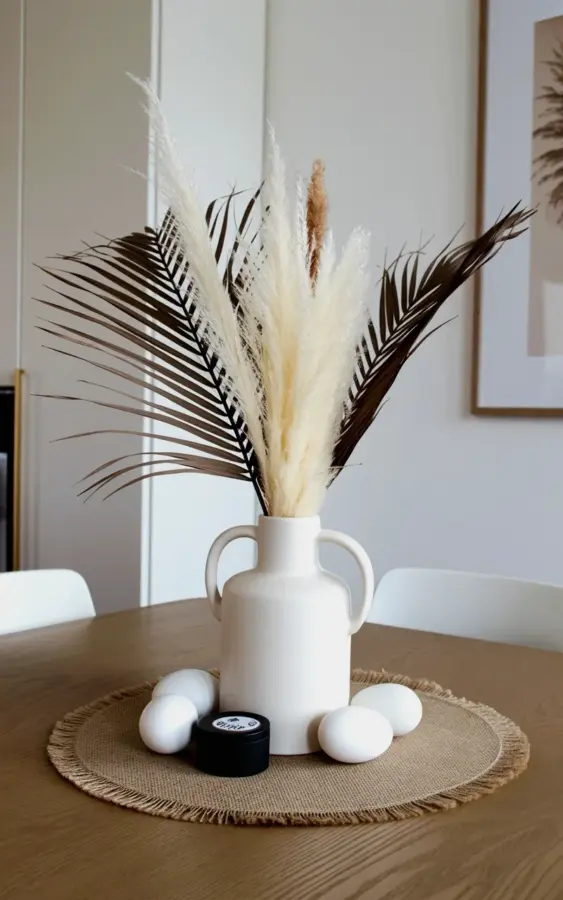
I have a confession: for a long time, dried pampas grass decor felt intimidating. Too boho, too curated, too much like something you’d see in a catalog but never actually pull off at home. But then I realized a minimalist centerpiece doesn’t have to be complicated or expensive. In fact, the one you see in the photo here cost me under twenty bucks total, and it took maybe fifteen minutes to put together. Honestly, that’s my favorite kind of project. Quick, cheap, and it makes my living room table look like a magazine spread. The secret is all in the layers: a white ceramic vase with handles, some creamy pampas, a burlap placemat, and a few tiny accents. Nothing fancy, but the effect is calm and intentional.
So here’s the thing. If you’ve been eyeing those fluffy pampas stems at craft stores but worried about making a mess or a design mistake, this post is for you. I’ll show you exactly how to replicate this look on a budget, with real-world options you can find at thrift stores, dollar bins, or your local home goods outlet. Ok, let’s get into it.
Budget Friendly Pampas Grass Centerpiece: Where to Shop
First rule of budget decorating: never buy full price. Pampas grass can be shockingly expensive if you grab it from a trendy boutique. But you can get a bundle for under five dollars at places like Hobby Lobby (wait for a sale) or even on Amazon, where sellers offer faux pampas that looks shockingly real. Yes, I said faux. Not gonna lie, real pampas sheds tiny fibers everywhere and my allergies hate it. So I use a mix of real dried pampas (one or two stems for texture) and artificial stems for bulk and stability. Cream and brown tones work best for that neutral living room decor vibe.
For the vase, look for a white ceramic vase with handles at a thrift store. I found mine for three dollars at Goodwill. It had a tiny chip on the bottom, but nobody sees that. The handles are key because they add visual weight and keep the arrangement from feeling top heavy. If you can’t find one with handles, a simple cylinder shape will do, but wrap a piece of twine or raffia around the neck to mimic that detail.
- Pampas stems: $5 from craft store (or $8 for a 10-pack of faux ones on Amazon)
- White ceramic vase with handles: $3 thrifted (or $12 at IKEA for a new one)
- Burlap placemat: $1 at dollar store
- Decorative eggs: $2 for a bag of wooden eggs at Michael’s
- Small black container: Reuse a black candle jar or a mini planter (free)
There. Under twenty dollars, and you probably already own half of that stuff anyway.
How to Arrange Dried Pampas Grass the Lazy Way
You know those arrangements where every stem is perfectly placed and evenly spaced? That’s not what we’re doing. Minimalist centerpiece ideas thrive on a little asymmetry. Here’s my method. Hold the tallest stem in your hand and look at it. Then shove it into the vase at a slight angle. Not straight up, not leaning too far, just enough to feel organic. Add the next stem a little lower, crossing the first one slightly. Repeat until you have about five to seven stems total. I use three tall pampas, two palm fronds (for structure), and two shorter filler stems that I cut down.
Palm fronds? Yes, they add a nice linear contrast to the fluffy pampas. I grabbed a bunch of artificial palm fronds from the dollar store and cut them to different heights. They cost a dollar for a pack of four. See, budget friendly. And they make the arrangement look more intentional instead of just “I stuck some grass in a jar.”
One weird thing: I always trim the pampas stems at different lengths. The tallest one sticks out about 18 inches above the vase rim. The shortest sits maybe 6 inches above. That range of height gives the arrangement that relaxed, airy feel. If all stems are the same height, it looks like a brush. Not what we want.
Neutral Living Room Table Decor: Layering a Burlap Placemat
Here’s the part that really makes the centerpiece pop. Sit the vase on a circular burlap placemat with frayed edges. The texture contrast between smooth ceramic vase and rough burlap is everything. Also, the placemat defines the space on your table and prevents the arrangement from feeling floaty. I got mine at a dollar store, but you can also cut a circle out of a burlap sack if you’re feeling crafty.
Place the mat slightly off center on your table. Not dead center. I know that sounds weird, but for some reason a centered placemat looks too symmetrical and stiff. Shift it about two inches to the left or right. Then put the vase on top. Now the burlap acts like a little stage. Around the base of the vase, scatter a few white decorative eggs. I use wooden eggs painted matte white. They’re cheap, and they echo the shape of the eggs you might see in spring decor without screaming “Easter.” Because let’s be real, we want a neutral living room table decor that works year round, not just for one holiday.
The small black container I mentioned? I placed it to the right of the vase, a little behind the burlap edge. It’s a tiny black ceramic pot I had from a succulent that died. I filled it with a few extra dried pods, but honestly it works even empty. That dark dot of color breaks up all the cream and beige and gives the eye a place to rest. Small contrast, big impact.
Ceramic Vase Styling Tips for Real Tables
Okay, so you have your vase with handles. Now, how do you style it so it doesn’t look like a prop from a 2014 Instagram? A few things I’ve learned from trial and error.
First, don’t overload the vase. The beauty of ceramic vase styling is negative space. Let the handles be visible. If you cram the opening full of stems, the handles disappear and you lose that lovely silhouette. I leave about an inch of empty space at the top of the vase opening. Also, the vase itself should be light in color. White, cream, soft gray. You want the focus on the pampas, not on a bright colored pot that screams “look at me.”
Second, consider the height of your table. A low coffee table needs a shorter vase so you can see across it. A dining table can handle taller stems. In the photo, the vase is medium height, about 8 inches tall, with stems reaching up to 26 inches total. That works on a standard coffee table or a sideboard. If your table is tiny, scale everything down. Use a smaller vase and fewer stems.
And here’s a personal aside. I once used a cheap plastic vase that looked like it belonged in a dorm room. My cat knocked it over within an hour. Seriously. Get ceramic. It’s heavier, it stays put, and it makes a nice sound when you set it down. That’s worth the extra few dollars.
Dried Pampas in a Vase: How to Keep It Looking Fresh (Kinda)
Dried pampas is low maintenance, but it does require a tiny bit of care. Over time, the fluff can sag or shed. To combat that, give your stems a gentle shake outside once a month to release loose fibers. Or, you can spray them with a light hairspray (unscented, please) to hold the fronds in place. I did that once and it worked surprisingly well. Just hold the can about a foot away.
Also, keep the arrangement out of direct sunlight. The sun will bleach the brown tones and turn them a washed out beige. If you like that look, go for it. But if you want the warm creamy color to last, put the vase in indirect light. My coffee table is to the left of a north facing window, and the pampas has stayed gorgeous for six months straight.
And don’t be afraid to swap out stems seasonally. Add a few dried orange slices in autumn. Switch to white blooms in winter. The beauty of dried pampas in a vase is that it’s a foundation you can layer other things on top of. Keep the pampas, change the accents.
Why Decorative Eggs and a Black Accent Work With Minimalist Decor
I will admit, when I first added decorative eggs to this centerpiece, I thought “this is going to look like a kindergarten craft table.” But I was wrong. The eggs, as long as they’re matte and neutral in color, just read as organic shapes. They repeat the soft oval of the pampas heads and the rounded belly of the vase. It’s an echo, not a distraction.
The small black container serves a different purpose. It’s a punctuation mark. In a sea of whites, creams, and browns, a tiny dark object pulls your eye in and grounds the arrangement. Without it, the whole thing can feel a little too airy, too pastel, almost faded. That little black dot is like the period at the end of a sentence. It says “this is finished, and it’s intentional.”
If you don’t have a black container, use a dark stone, a matte black candle, or even a small piece of driftwood that’s been burned. The point is contrast. Don’t overthink it.
And look, I know some people will say “decorative eggs are cliché.” But here’s my take: clichés become clichés because they work. Just keep them minimal. Three eggs, not a dozen. Spread them slightly apart. Let them nestle into the edge of the burlap. Done.
Final Thoughts and a Quick Challenge for You
So that’s it. A minimalist centerpiece that cost next to nothing, took no special skills, and brings a calm warmth to your living room. The burlap placemat, the ceramic vase with handles, the creamy pampas and palm fronds, the eggs and the tiny black accent. You can tweak any of these elements to fit your own style, your own budget, your own weird collection of thrifted finds. That’s the point. It’s your table, your rules.
Give it a try this weekend. Grab a vase, a few stems, and something to set them on. Arrange them without overthinking. Let it be a little lopsided. Let it be simple. And if you make something you love, I’d genuinely love to hear about it. Drop a comment below or tag me on social if you want to share your version. Happy styling.
#dried pampas grass decor #minimalist centerpiece ideas #neutral living room decor #ceramic vase styling #burlap placemat
Leave a Comment