Okay, it’s a rainy Tuesday afternoon and I’m sitting on the floor of my living room with a tape measure in one hand and a coffee mug in the other. I had just saved my twelfth window seat idea on Pinterest and realized something: the perfect window seat with built-in bookshelves wasn’t going to materialize on its own. So I built one. Honestly, it changed the entire feel of the room, and I want to walk you through the exact process so you can do the same without the guesswork.
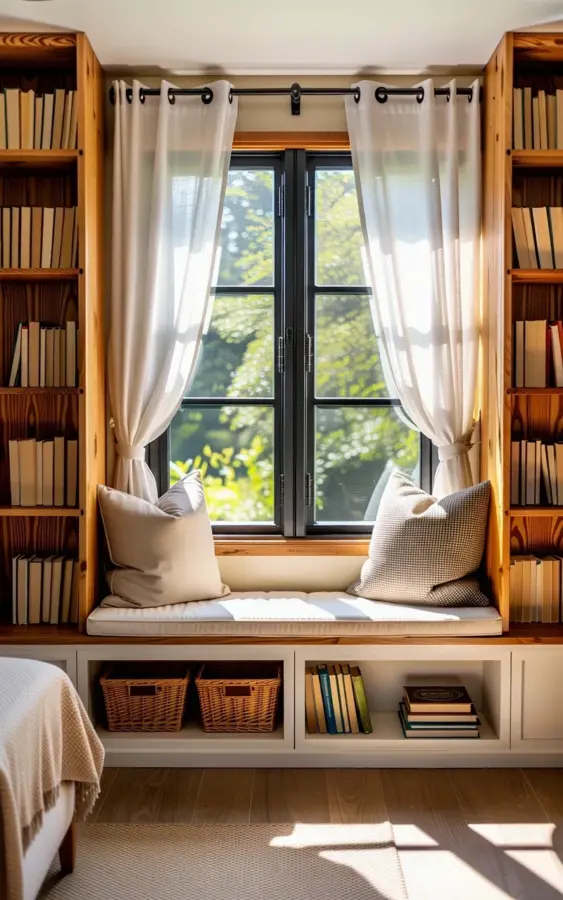
The nook you see in the photo that inspired this post has all the elements I love: natural wood shelves with visible grain on both sides of a black-framed window, white floor-length curtains, a cushioned bench with a beige and a gray textured pillow, and two glass-front storage cubbies holding woven baskets below. It’s cozy, practical, and it makes a small living room look intentional. Here’s how to get there.
Why I tacked this project onto a normal weekend
Look, I’m not a professional carpenter. I’m a person who owns a drill, a level, and an unreasonable amount of patience. But I knew that a window seat with bookshelves would solve two problems at once: my overflowing book collection and the awkward empty corner near the window that always collected dust. The trend toward cozy home projects exploded this year, and for good reason. People are spending more time at home, and they want spaces that feel like a hug, not a showroom.
I also love that this design works in any season. In spring, the green foliage outside the black-framed window becomes the artwork. In fall, you pile on chunky knit blankets and watch the rain streak down the glass. That’s the real reason I built it: a permanent spot for changing moods.
What you need before you start: tools, materials, and a plan
Before you buy anything, measure your window and the floor space around it. My window is 60 inches wide, and the bench is 48 inches long, 18 inches deep, and 18 inches high. That leaves enough room for the bookshelf columns on each side without crowding the curtains. The photo shows the shelves flush against the window frame, which looks clean and custom. You can do the same with standard 1×12 pine boards, but be prepared to sand and seal them so the grain shows. That natural wood texture is half the charm.
Here’s what I used, and this list won’t break the bank:
– Two 1x12x8 pine boards for the shelf sides and horizontal pieces
– One 3/4-inch plywood sheet for the bench base and cubby frame
– A miter saw (or a circular saw if you’re confident)
– A stud finder, level, drill, and 2.5-inch wood screws
– Wood glue, wood filler, sandpaper, and a clear matte sealer
– White cabinet paint for the cubbies and bench base
– Four woven baskets that fit inside the cubbies (measure twice, buy once)
The glass panels on the cubbies are optional. I ordered two simple cabinet doors with glass inserts from a big-box store and attached them with hinges. If you want to skip that, open cubbies with baskets work just fine. But the glass keeps dust off the books and makes the whole thing feel built-in.
Step one: build the bookshelf columns around the window
This is the part that looks complicated but isn’t. I started by attaching vertical support boards to the wall on each side of the window, using a stud finder to anchor them securely. Then I cut horizontal shelves to span from the window frame to the outer edge of the vertical boards. The photo shows each column with four shelves, with the bottom shelf sitting just above the bench height. That’s a good proportion for a standard 8-foot ceiling.
A quick tip: cut a cardboard template for the first shelf. It sounds tedious, but it saves you from wasting wood on a wrong angle. Once the first shelf fits flush, use it as a guide for the rest. I also added small L-brackets under each shelf for extra support, because hardcover books are heavy. And not gonna lie, the visible grain on the pine boards looked so good after sealing that I almost didn’t want to paint anything. But the white cubbies in the photo create a nice contrast with the warm wood, so I stuck with the plan.
Step two: the window seat bench with storage cubbies
Build the bench as a separate box frame, then slide it between the bookshelf columns. I made the frame from 2x4s and covered it with plywood. The front face has two square openings, each about 15 inches wide and 15 inches tall. Those are your cubbies. I painted the entire bench base white, including the inside of the cubbies, which makes the woven baskets pop exactly like they do in the photo.
The bench seat itself is a plywood board with a 3-inch thick foam cushion on top. If you’re making this for a living room, attach the bench base to the wall with a couple of screws so it doesn’t shift. I learned that the hard way after my first test sit. The glass doors on the cubbies came next, but you can add them after the baskets are in place. The storage is the best part honestly. Those woven baskets hide board games, extra throws, and the random cables I never know what to do with.
Cushions, pillows, and the comfort layer
Here’s the thing: a hard wooden seat is not a reading nook. You need a cushion that makes you want to stay for three chapters, not three minutes. I bought a 4-inch thick foam cushion with a removable white cover, because the photo shows a clean white base. Then I added two pillows: one in beige linen and one in a gray textured fabric. That exact combination gives the space a calm, layered look without trying too hard.
Don’t overdo the pillows. Two is enough. Three starts to look like a furniture store display. And please, for your own neck, make sure the cushion extends a couple of inches beyond the bench edges. It looks more inviting and it’s easier to sit on. Also, washable covers are a lifesaver if you eat toast in the nook like I do.
Making it seasonal: fall and winter reading nook ideas
The photo shows green leaves outside the window, which is lovely, but as the weather turns, your nook can keep up. I swap the woven baskets for slightly darker ones in October. I add a chunky cream blanket folded over the armrest, and I switch the beige pillow case to a burnt orange version. Small changes, big effect. In winter, the built-in bookshelves become a backdrop for string lights woven through the bookends. It’s like a warm cave in the middle of the living room.
This is the trend-aware part: the “old money” aesthetic and quiet luxury trends are all about investing in a few quality pieces instead of trendy decor. A window seat with built-in bookshelves fits that perfectly. It’s permanent, functional, and it doesn’t scream for attention. You’re not just decorating a corner, you’re adding real estate to your home.
Why this won’t go out of style
I get asked if this is just a passing Pinterest phase. No. Built-in shelving and window seats have been around for centuries, and they keep coming back because they solve real problems. Books, storage, seating, and a view all in one compact footprint. For small living rooms, it’s basically a magic trick. You gain a reading nook and lose a cluttered wall.
Plus, the natural wood shelves age well. They’ll darken slightly over time, and that grain pattern only gets better with use. The white cubbies let you change baskets, bins, or decor without repainting anything. I’ve had mine for two winters now, and I still catch myself staring at it while pretending to read. The only downside is that my cat thinks the bench was custom built for her. It was, honestly. She just doesn’t pay rent.
So if you’re ready to turn that useless window corner into something you actually use, start with a rough sketch and a tape measure. You don’t need a perfect plan, just a good starting point. And hey, if you build one, tag me in a photo. I’d love to see your version. Happy building, and save this post for the next time you’re staring at an empty wall with a little daylight.
Leave a Comment